Introduction
Git is the most popular distributed version control system. Git is commonly used for both open source and commercial software development.
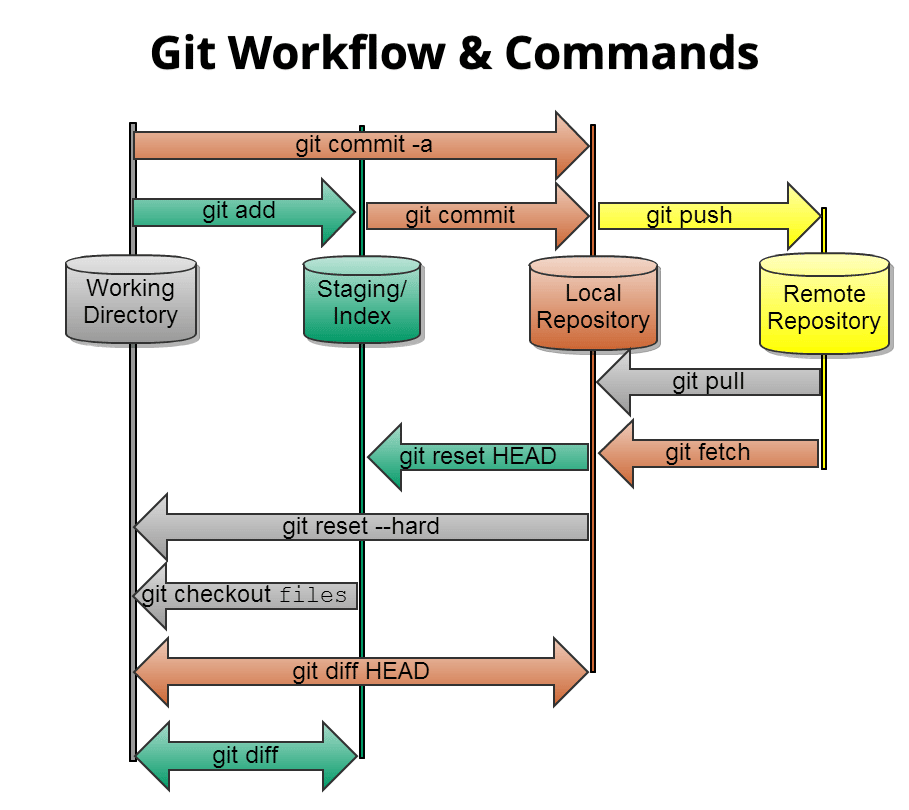
Here, we review commonly needed git commands that are used throughout project lifecycle.
Git Usage
- Manage projects with Repositories
- Clone a project to work on a local copy
- Control and track changes with Staging and Committing
- Branch and Merge to allow for work on different parts and versions of a project
- Pull the latest version of the project to a local copy
Push local updates to the main project
Working with Git
- Initialize Git on a folder, making it a Repository
- Git now creates a hidden folder to keep track of changes in that folder
- When a file is changed, added or deleted, it is considered modified
- You select the modified files you want to Stage
- The Staged files are Committed, which prompts Git to store a permanent snapshot of the files
- Git allows you to see the full history of every commit.
- You can revert back to any previous commit.
- Git does not store a separate copy of every file in every commit, but keeps track of changes made in each commit!
Essential Git Commands
Check your current git version
$ git –version
Create a connection between a local and remote repository?
$ git remote add origin
To stage all new and updated files
$ git add -A
To add all modified files to the staging area, then commits them with a message
$ git commit -a -m “Refactor code base”
To create a new git repository
$ git init
To print a list of remote repositories you are connected with
$ git remote -v
To get a copy of an existing Git repository
$ git clone https://github.com/apache/superset.git
Push the code in your local repository to GitHub
$ git push -u origin master
In the above command, the origin is your default remote repository name and ‘-u’ flag is upstream, which is equivalent to ‘-set-upstream.’ and the master is the branch, name.upstream is the repository that we have cloned the project.
To pull changes from a remote repository to your local branch
$ git pull ‘remote_name’ ‘branch_name’.
The git pull command is a combination of git fetch which fetches the recent commits in the local repository and git merge, which will merge the branch from a remote to a local branch also ‘remote_name’ is the repository name and ‘branch_name’ is the name of the specific branch.
To create a new branch from the currently checked-out branch
$ git checkout -b
To apply a commit from its original branch over to the feature-user-location branch
$ git checkout feature-user-location
$ git cherry-pick {kj2342134sdf090093f0sdgasdf99sdfo992mmmf9921231}
To remove testfile.js from the staging area and stop tracking its changes
$ git rm –cached testfile.js
To list tags with the 1.4.2 series
$ git tag -I ‘v1.4.2.*’
To Add and Commit Files to Git Repository
Check if your file is actually present in the directory (if you’re on Windows, use dir instead):
$ ls
You should see the name of the file in the list shown.
Check the status:
$ git status
Your file’s name should appear in red, so git took notice of it! Now add it to the repository:
$ git add <name of file>
or, add all files in the directory :-
$ git add .
Check the status again, your file’s name should have turned green:
$ git status
Commit (save) your file to the repository:
$ git commit -m “DESCRIBE COMMIT IN A FEW WORDS”
Now you can push (send) your changes (in the branch <branch-name>) to GitLab (the Git remote named ‘origin’):
$ git push origin <branch-name>
Your files are added to your branch in your repository.
Merging
Merging is Git’s way of putting a forked history back together again. The git merge command lets you take the independent lines of development created by git branch and integrate them into a single branch.
Our first example demonstrates a fast-forward merge. The code below creates a new branch, adds two commits to it, then integrates it into the main line with a fast-forward merge.
# Start a new feature
$ git checkout -b new-feature main
# Edit some files
$ git add
$ git commit -m “Start a feature”
# Edit some files
$ git add
$ git commit -m “Finish a feature”
# Merge in the new-feature branch
$ git checkout main
$ git merge new-feature
$ git branch -d new-feature
This is a common workflow for short-lived topic branches that are used more as an isolated development than an organizational tool for longer-running features.
3-Way Merge
The next example is very similar, but requires a 3-way merge because main progresses while the feature is in-progress. This is a common scenario for large features or when several developers are working on a project simultaneously.
Start a new feature branch from main
$ git checkout -b new-feature main
# Edit some files
$ git add .
$ git commit -m “Start a feature”
# Edit some files
$ git add
$ git commit -m “Finish a feature”
# Develop the main branch
$ git checkout main
# Edit some files
$ git add
$ git commit -m “Make some super-stable changes to main”
# Merge in the new-feature branch
$ git merge new-feature
$ git branch -d new-feature
Note that it’s impossible for Git to perform a fast-forward merge, as there is no way to move main up to new-feature without backtracking.
For most workflows, new-feature would be a much larger feature that took a long time to develop, which would be why new commits would appear on main in the meantime. If your feature branch was actually as small as the one in the above example, you would probably be better off rebasing it onto main and doing a fast-forward merge. This prevents superfluous merge commits from cluttering up the project history.
Rebasing
In Git, there are two main ways to integrate changes from one branch into another: the merge and the rebase.
You can take the patch of the change that was introduced in C4 and reapply it on top of C3. In Git, this is called rebasing. With the rebase command, you can take all the changes that were committed on one branch and replay them on a different branch.
For this example, you would check out the experiment branch, and then rebase it onto the master branch as follows:
$ git checkout experiment
$ git rebase master
First, rewinding head to replay your work on top of it…
Applying: added staged command

This operation works by going to the common ancestor of the two branches (the one you’re on and the one you’re rebasing onto), getting the diff introduced by each commit of the branch you’re on, saving those diffs to temporary files, resetting the current branch to the same commit as the branch you are rebasing onto, and finally applying each change in turn.
At this point, you can go back to the master branch and do a fast-forward merge.
$ git checkout master
$ git merge experiment

Stashing and Cleaning
Often, when you’ve been working on part of your project, things are in a messy state and you want to switch branches for a bit to work on something else. The problem is, you don’t want to do a commit of half-done work just so you can get back to this point later. The answer to this issue is the git stash command.
Stashing takes the dirty state of your working directory — that is, your modified tracked files and staged changes — and saves it on a stack of unfinished changes that you can reapply at any time (even on a different branch).
Stashing Your Work
To demonstrate stashing, you’ll go into your project and start working on a couple of files and possibly stage one of the changes. If you run git status, you can see your dirty state:
$ git status
Changes to be committed:
(use “git reset HEAD …” to unstage)
modified: index.html
Changes not staged for commit:
(use “git add …” to update what will be committed)
(use “git checkout — …” to discard changes in working directory)
modified: lib/simplegit.rb
Now you want to switch branches, but you don’t want to commit what you’ve been working on yet, so you’ll stash the changes. To push a new stash onto your stack, run git stash or git stash push:
$ git stash
Saved working directory and index state \
“WIP on master: 049d078 Create index file”
HEAD is now at 049d078 Create index file
(To restore them type “git stash apply”)
You can now see that your working directory is clean:
$ git status
# On branch master
nothing to commit, working directory clean
At this point, you can switch branches and do work elsewhere; your changes are stored on your stack. To see which stashes you’ve stored, you can use git stash list:
$ git stash list
stash@{0}: WIP on master: 049d078 Create index file
stash@{1}: WIP on master: c264051 Revert “Add file_size”
stash@{2}: WIP on master: 21d80a5 Add number to log